AwesomePrint Tips and tricks
On a previous episode we saw the basic usage of the AwesomePrint gem.
That's the basic usage of the gem. It's very nice to have a way to pretty print strings and to put some color to our outputs.
But that's not the end of the story.
I want to show a couple of tricks I developed over the years to use AwesomePrint to assist my day to day work.
Hash printing
Both tricks hinge on the fact that I tend to debug using ap and puts most of the time.
Say we have a script that lists all the index files under the episodes directory, and then extracts the slugs for each of them, looking at the directory each of them is located under.
require "rake/file_list"
require "pathname"

episode_indexes = Rake::FileList["./episodes/*/index.{md,org,adoc}"]

episode_slugs = episode_indexes.map { |episode_index|
  Pathname(episode_index).dirname.basename.to_s
}

puts episode_slugs
If you don't use FileLists and Pathnames often, you can easily get lost in this code.
When I have to write code like this one, I use the ap method heavily. I'll probably do the following experiments on a test file and run after each change.
First lets write that first FileList, but starting from the beginning. We start by asking just for the top level episodes directory.
require "rake/file_list"
require "pathname"

ap Rake::FileList["./episodes"]
Ok, this just shows us the root directory of the project.
$ ruby awesome-print.rb
["./episodes"]
We can add an asterisk to show all the folders inside.
require "rake/file_list"
require "pathname"

ap Rake::FileList["./episodes/*"]
This shows all the directories. But we need just the ones that contain an index.md, index.org or index.adoc file, since those are our actual episodes. Anything else is just noise.
$ ruby awesome-print.rb
["./episodes/awesome-print", "./episodes/faker", "./episodes/pathname", "./episodes/seeing-is-believing", "./episodes/tempdir", "./episodes/tempfile"]
Since we're using AwesomePrint, lets actually make use of it and show the file list as an Array,
require "rake/file_list"
require "pathname"

ap Rake::FileList["./episodes/*"].to_a
which looks better on a terminal.
Now it's much easier to see that there are some episodes we want to list, but one that we don't.
$ ruby awesome-print.rb
[
    "./episodes/awesome-print",
    "./episodes/awesome-print-tips",
    "./episodes/not-an-episode",
    "./episodes/phlex",
    "./episodes/rails-template"
]
We want to list the proper episode list, but we don't want to loose track of all the directories in the output just yet so I can compare them.
And here is where the trick comes in. I could just print one and then print the other.
ap Rake::FileList["./episodes"].to_a
ap Rake::FileList["./episodes/*"].to_a
But if we're doing this in a codebase with some extra output, this could get confusing.
$ ruby awesome-print.rb
[
    "./episodes"
]
[
    "./episodes/awesome-print",
    "./episodes/awesome-print-tips",
    "./episodes/not-an-episode",
    "./episodes/phlex",
    "./episodes/rails-template"
]
So instead of doing so, we're going to print a hash, where the keys are some sort of explainatory symbol and the values are the actual method calls.
The keys don't even need to be very descriptive, just something that makes sense to us at that moment. This code will get axed very soon.
ap({
     directory: Rake::FileList["./episodes"].to_a,
     episodes:  Rake::FileList["./episodes/*"].to_a,
   })
We can even remove the curly braces so it looks better.
ap(
  directory: Rake::FileList["./episodes"].to_a,
  episodes:  Rake::FileList["./episodes/*"].to_a,
)
And now we can actually see a more explicit output.
$ ruby awesome-print.rb
{
  :directory => [
      "./episodes"
  ],
  :episodes => [
      "./episodes/awesome-print",
      "./episodes/awesome-print-tips",
      "./episodes/not-an-episode",
      "./episodes/phlex",
      "./episodes/rails-template"
  ]
}
We can now add a new line that returns all the directories with index files.
ap(
  directory: Rake::FileList["./episodes"].to_a,
  episodes:  Rake::FileList["./episodes/*"].to_a,
  indexes:  Rake::FileList["./episodes/*/index.*"].to_a,
)
And see it's output.
$ ruby awesome-print.rb
{
  :directory => [
    "./episodes"
  ],
   :episodes => [
    "./episodes/awesome-print",
    "./episodes/awesome-print-tips",
    "./episodes/not-an-episode",
    "./episodes/phlex",
    "./episodes/rails-template"
  ],
    :indexes => [
    "./episodes/awesome-print-tips/index.md",
    "./episodes/awesome-print/index.org",
    "./episodes/not-an-episode/index.html",
    "./episodes/phlex/index.md",
    "./episodes/rails-template/index.org"
  ]
}
Finally, we can filter out anything that doesn't have the right extension. Now we can remove the first two lines, since we outgrowed them.
ap(
  indexes:  Rake::FileList["./episodes/*/index.*"].to_a,
  episodes: Rake::FileList["./episodes/*/index.{org,md,adoc}"].to_a,
)
And run the script to compare which directories are filtered.
$ ruby awesome-print.rb
{
   :indexes => [
    "./episodes/awesome-print-tips/index.md",
    "./episodes/awesome-print/index.org",
    "./episodes/not-an-episode/index.html",
    "./episodes/phlex/index.md",
    "./episodes/rails-template/index.org"
  ],
  :episodes => [
    "./episodes/awesome-print-tips/index.md",
    "./episodes/awesome-print/index.org",
    "./episodes/phlex/index.md",
    "./episodes/rails-template/index.org"
  ]
}
We can keep going on with the extraction of the episode slugs, but I think you get the gist.
This gets really useful when we have a lot of variables or method names that are somewhat similar, either in names or values. I use this all the time.
dg* snippets
My second trick makes use of my editor's capacity to add custom text snippets. You can do it without snippets, but having them makes trivial to implement.
Say we have some code with lots of logging or text output.
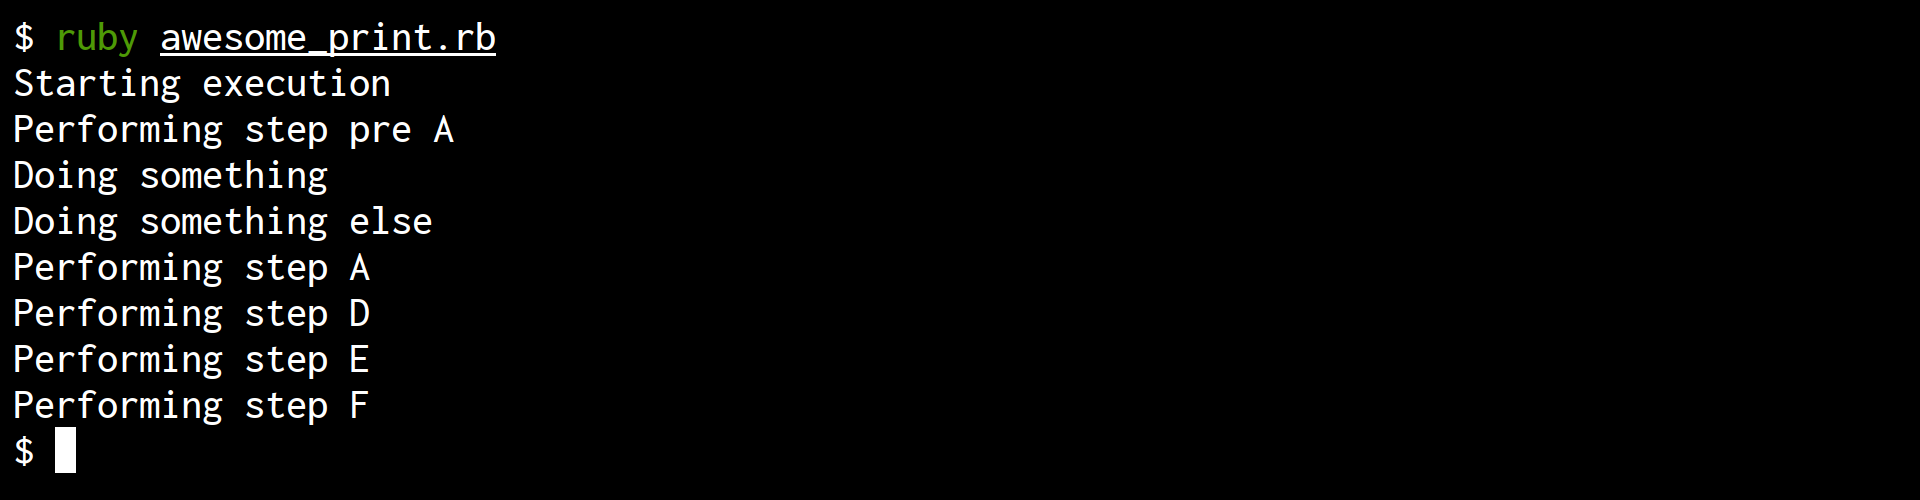
$ ruby awesome-print.rb
Starting execution
Performing step pre A
Doing something
Doing something else
Performing step A
Performing step D
Performing step E
Performing step F
We want to see if our code has actually reached a specific point in the execution chain, but it's difficult to see.
Take a look at this very contrived piece of source code.
We want to see if step C has been performed and we don't want to jump into the debugger.
puts "Starting execution"

puts "Performing step pre A"
puts "Doing something"

puts "Doing something else"

puts "Performing step A"

if flag_one
  puts "Performing step B"
  if flag_two
    puts "Performing step C"
  end
end

puts "Performing step D"
puts "Performing step E"
puts "Performing step F"
But from the output is hard to quickly assess if it was run, at least for me.
So what I do is go to the line I want to see printed, type the string dg, which is the trigger for my snippet
if flag_two
  dg
  puts "Performing step C"
end
and then expand it. The expanded string adds a bit of whitespace at the beginning of the line in order to force some indentation. Then it adds a couple of > characters in order to make the line longer. Then adds the file we're currently in, and the line number. Finally, it colours it red so it stands out.
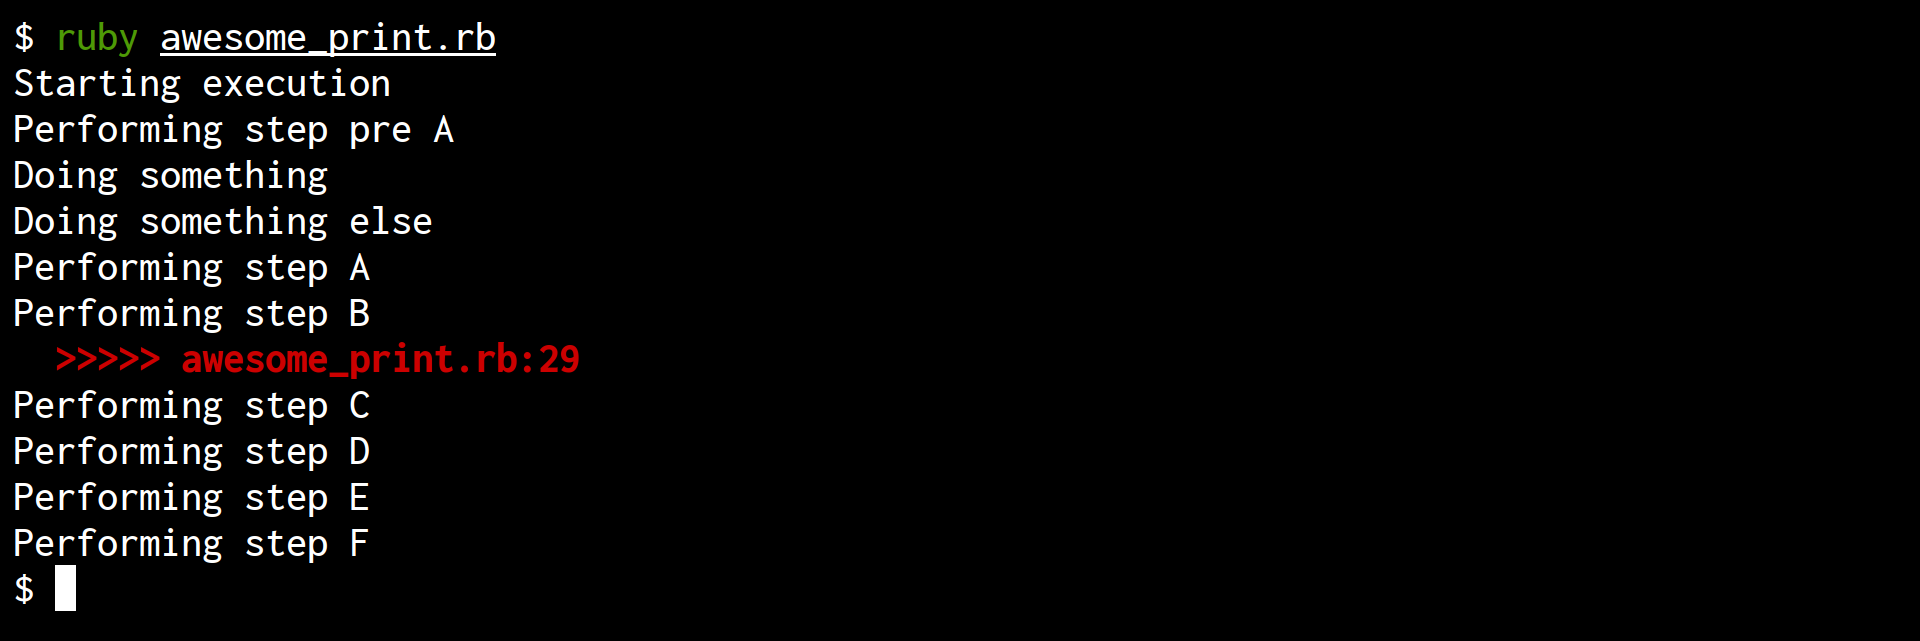
This way, if we run this file as a step on a bigger context, we know exactly where we are.
if flag_two
  puts "  >>>>> #{__FILE__}:#{__LINE__}".red
  puts "Performing step C"
end
We still can't see anything different, which means the path is not being triggered.
But if we change those flags we're switching on, we can see our red marker.
I have snippets for several colors in case I want to drop in more than one marker.
dg
dgr
dgg
dgp
dgy
dgc
These expand to the same type of marker, but with different colors
puts "  >>>>> #{__FILE__}:#{__LINE__}".red
puts "  >>>>> #{__FILE__}:#{__LINE__}".red
puts "  >>>>> #{__FILE__}:#{__LINE__}".green
puts "  >>>>> #{__FILE__}:#{__LINE__}".purple
puts "  >>>>> #{__FILE__}:#{__LINE__}".yellow
puts "  >>>>> #{__FILE__}:#{__LINE__}"
Which look very distinct from each other on the terminal

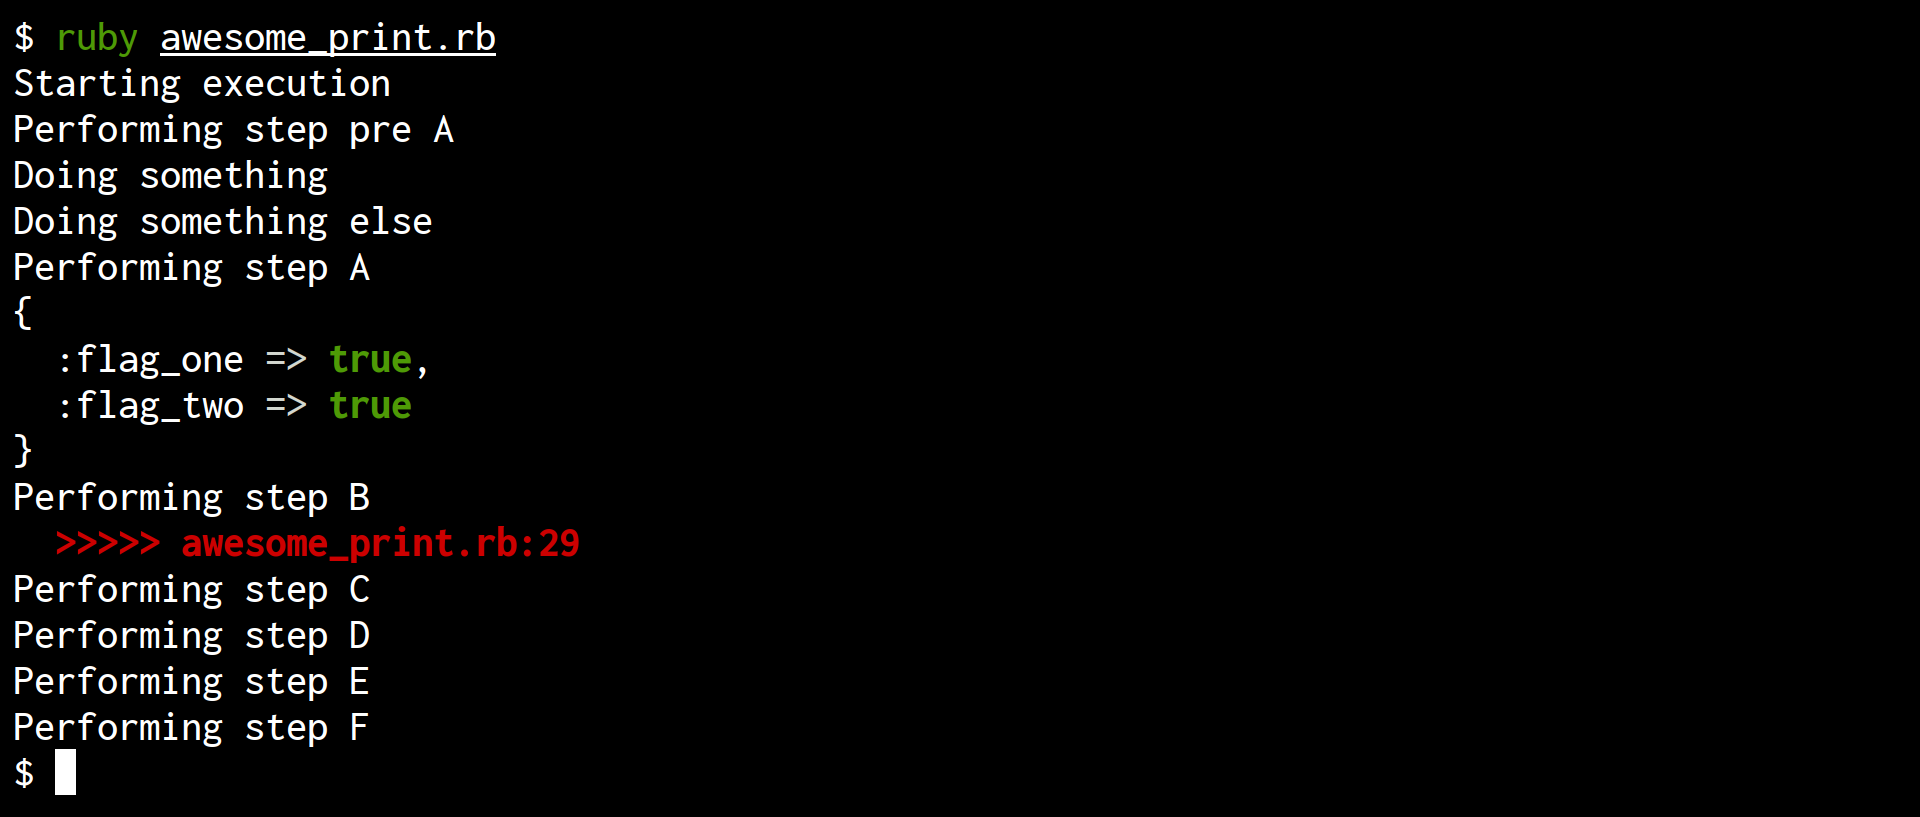
Of course, we could combine this trick with the one before,
# ...
puts "Performing step A"

ap(
  flag_one: flag_one,
  flag_two: flag_two,
)

if flag_one
  puts "Performing step B"
  if flag_two
    puts "  >>>>> #{__FILE__}:#{__LINE__}".red
    puts "Performing step C"
  end
end

puts "Performing step D"
and when we run our script again, we can see exactly which flag is the one that's failing us.
Conclusion
We learned how to use AwesomePrint and how I actually use it in my day to day work.
I'm sure there are a million other tips and tricks for using this gem and I'll be sharing them if they come my way. I encourage you to try out both AwesomePrint and the tricks I showed you in this episode. And please, if you have any other tips, leave them in the comments so other folks can benefit.
Thanks for watching and I'll see you in the next one.